Posts
-
Infosec: Enumerating subdomains
This posts lists a few ways to enumerate subdomains.
Check registered domains via CA
Google Transparency Report tool: Use this to find domains and list certificates.
Use google search
This will exclude all results with “www.domain.com”, and include everything else.
-site:www.domain.com site:*.domain.comBrute forcing
Using ffuf
Fast web fuzzer written in Go.
-
Via direct subdomain
ffuf -w ~/infosec/SecLists/Discovery/DNS/namelist.txt -u http://FUZZ.domain.com-
Via Host header in the request
# This enumerates via 'Host' header in the request
ffuf -w ~/infosec/SecLists/Discovery/DNS/namelist.txt -H "Host: FUZZ.domain.com" -u http://www.domain.com -fs 2395
Similar enumeration tools:
pip3 install dnsrecon# Installation pip3 install sublist3r -
-
#14 - home automation
Since Apple realeased HomeKit I have been more and more interested in building a small brain for my house. I find it futuristic and fascinating.
So here what I put together:
Hardware
- 2 ESP8266: 2$ microcontrollers with embedded wifi;
- The Next Thing C.H.I.P;
- Raspberry Pi Zero W;
- WiFi enabled Lightbulb;
- WiFi enabled Power socket;
- External IP camera;
- Smart thermostat.
Software
CHIP runs
- MQTT Server;
- PM2 (2 processes with some js code);
- Read data from ds18b20 sensor (OneWire);
- Fail2Ban.
RPI runs
- HassOS
- Hass.io;
- Web server to display informations;
- HomeKit bridge and conversion of appliances data;
- Presence detector.
ESP runs
- Arduino sketch that does the following:
- Read data from DS18B20 sensor;
- Send data to MQTT server.
Could it be simplified?
Of course. But I bought them on different occasions and I just kept adding parts.Architecture

I ditched Google Home in favor of a HomePod and Siri.. yeah, not quite there yet, but for now I’m happy with my choice. The only problem is: increadibly low number of supported appliances. Before 2018 HomeKit certification required Apple’s approval and hardware implementation.
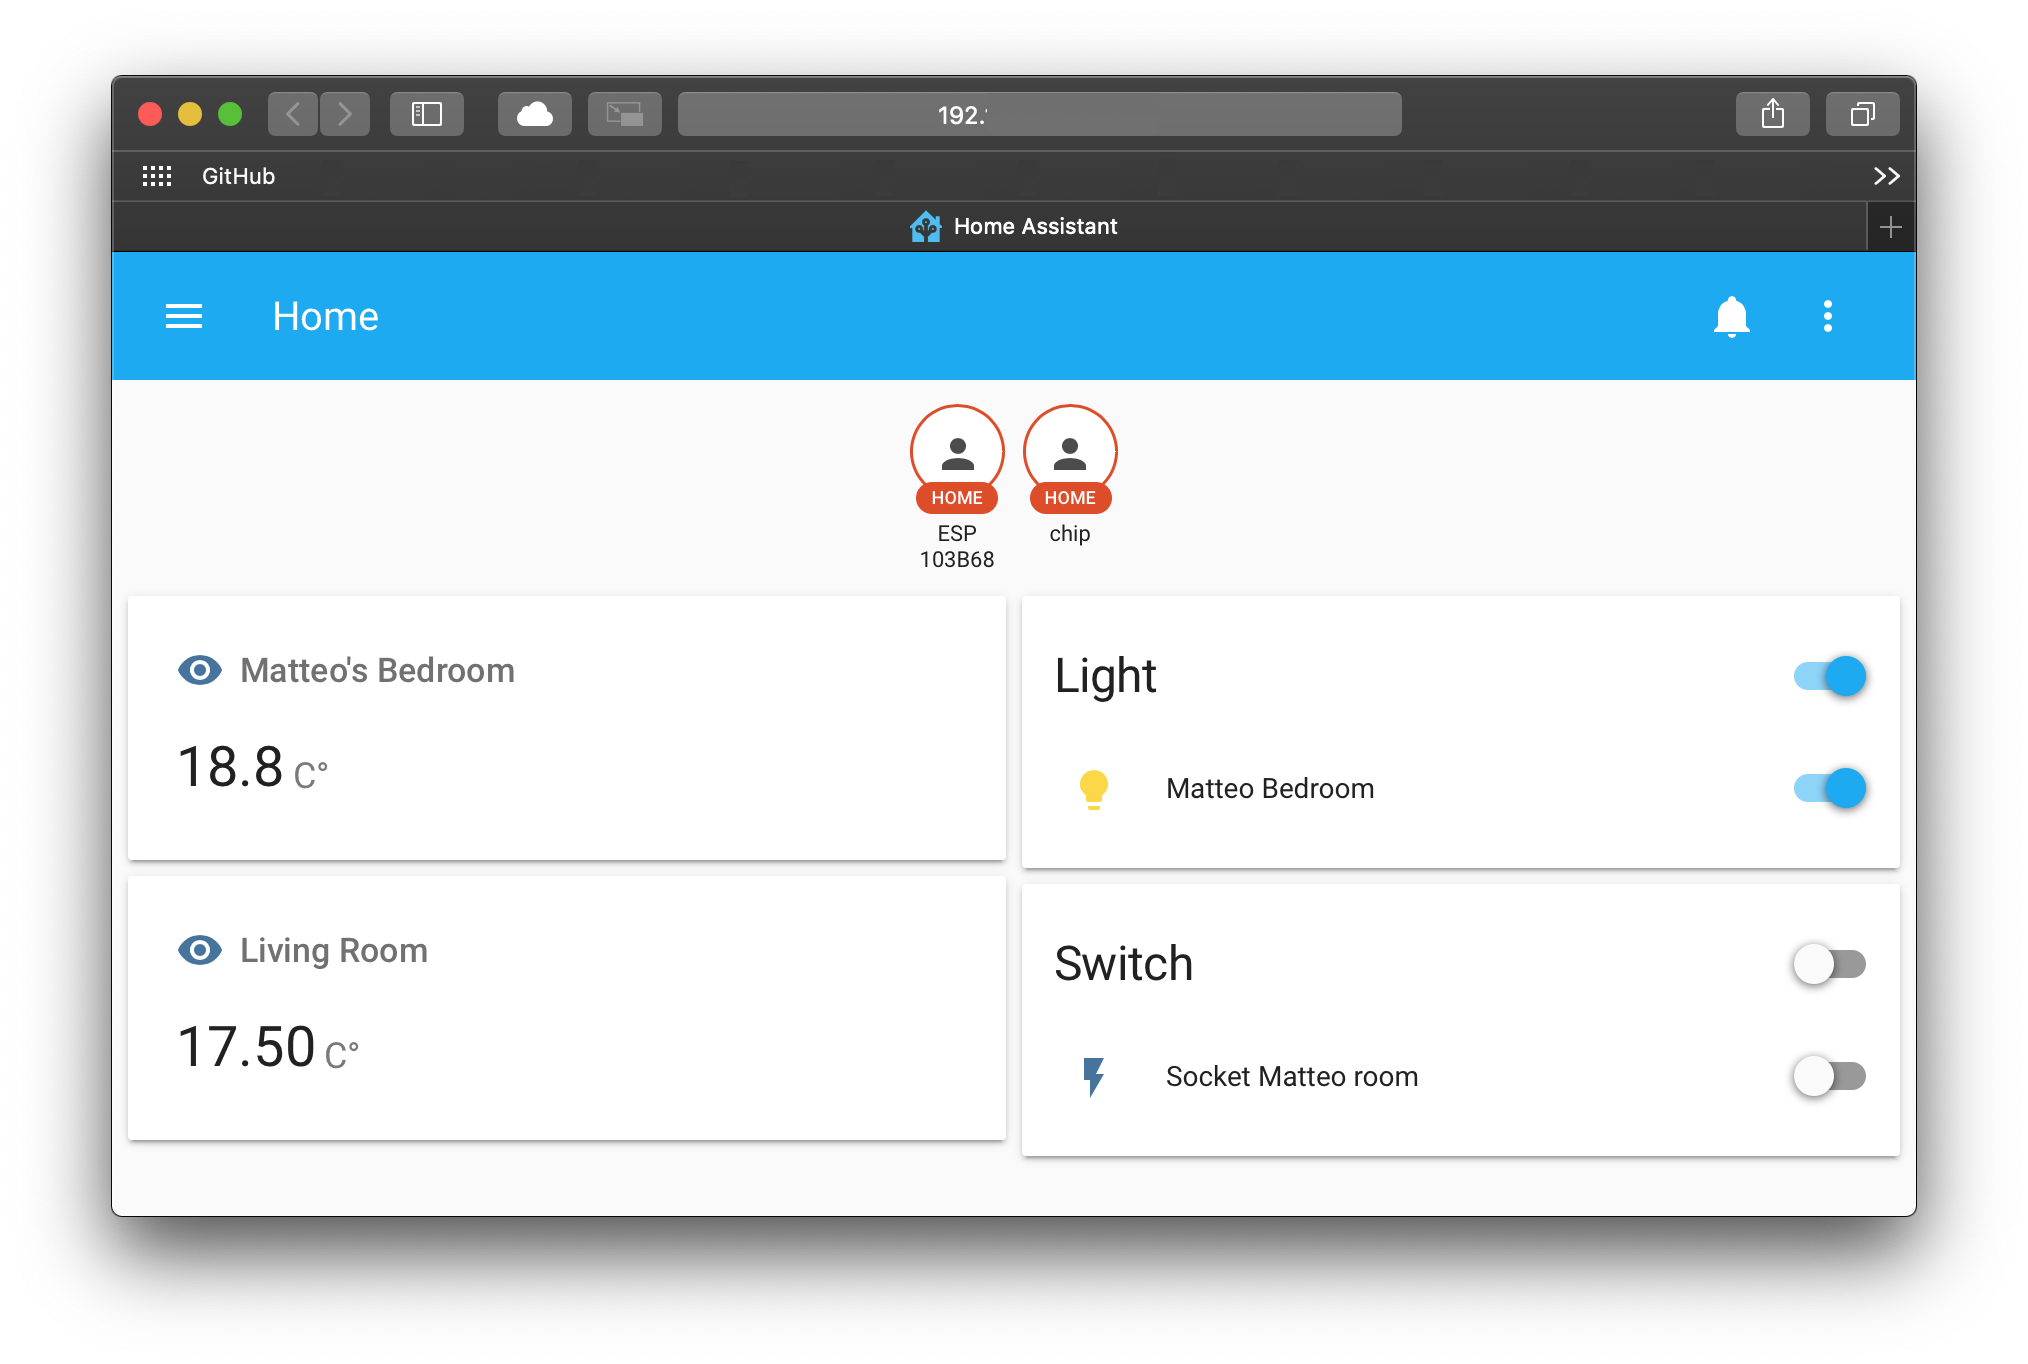
Now it can be achieved via software, and the adoption is increasing. Slowly.In my configuration, the Raspberry Pi is the main node. It runs and share the custom appliances to HomeKit (HomePod), which allows me to control them remotely via Apple’s Home app. To gather those informations, it connects to C.H.I.P. via MQTT, subscribing to the channels used by the thermometers. It also connects to the thermostat’s gateway, lightbulb and power socket.
It runs a web server from which I can see and control the status.
Sensors and communication
The standard seems to be MQTT.
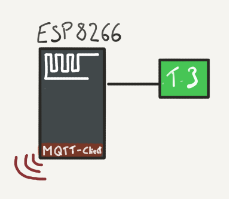
MQTT is a protocol designed to be fast and lightweight via publish/subscribe mechanism. The ESP8266 awakes from sleep, connects to the wifi and the MQTT server, reads the data from the temperature sensor and sends it over via a topic likehome/_room_/_sensor_. Same thing for the sensor attached to the C.H.I.P., it simply routes the message to localhost.The esp runs this sketch
Bridge to HomeKit
I am aware of 2 easy ways to bring unsupported/custom devices to homekit: homeassistant or Homebridge. The first one wants to be the main-hub for everything inside your house, and has thousands of components ready-to-run. The second one is exactly what it looks like: a bridge between 3rd party appliances and HomeKit.
I used to prefer Homebridge, but this time I decided to go with homeassistant.io because they recently changed their installation flow: now it’s similar to what Raspberry Pi does with Raspbian, but Homeassistant calls it HassOS.
It’s incredible how both solutions are simple to integrate with the Home app. The only necessary step is to scan or insert the code when prompted.
Reliability
This was a bit of a tricky part. Outages in electricity and network are expected, and I really do not want to spend time checking what is or is not online.
I have come across PM2, a brilliant piece of software.It’s extremely easy to configure, it supports js and binaries. It has a nice
pm2 startupcommand that generates a launch script to respawn all the currently-running apps. It has been extremely useful and if anything happens I have always seen the component brouhgt back to life and reconnected.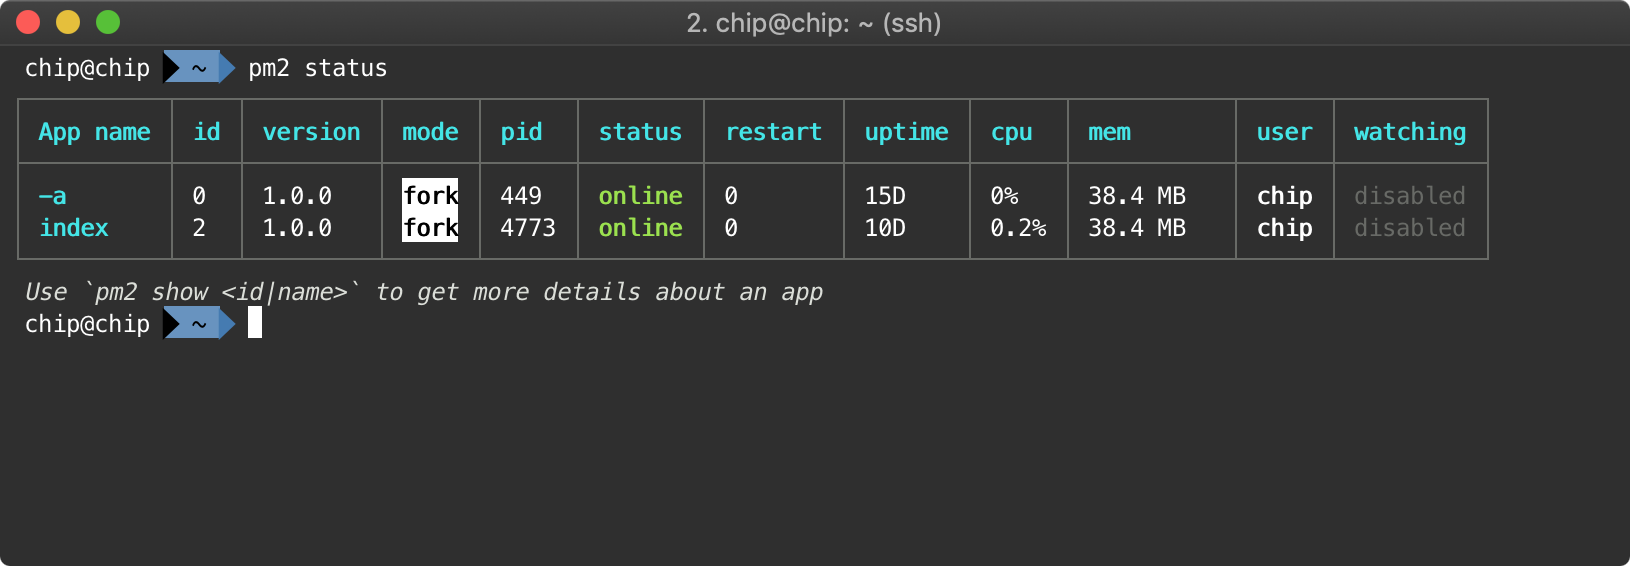
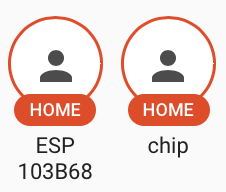
I also use the module presence detection available in homeassistant to have a glance of the status of the other components. If they not home.. well, they are offline for some reason or I got burglarized.
Next steps?
I only recently bought 2 ESP32, which they should be much more capable than the ESP8266. In the meantime I will change the sketch to support ultra-low energy consumption by the ESP8266, and try to leave it around. Would be nice to build a small case for it.
The only exception? Security devices.
No way I will ever point a camera inside my home, and I will never ever buy “smart” locks. :) -
#13 - Protocols and delegates
At The Outnet we decided it would be a good idea to organize a weekly meetup about iOS tech, to share ideas, experiences, and anything that the more junior members would like to rehash.
One good question I got was about Protocols and Delegates:
how do we use them and how do they differ?Let’s start by highlighting the difference, focusing on iOS.
A Protocol is a components of the Swift (or Obj-C) programming language
A Delegate is the implementation of the Delegation Pattern (Object Oriented Programming)A small refresher for the Objective-C syntax and Swift:
// Objective C
@protocol MyProtocol

// properties and methods signatures

@end
// Swift protocol MyProtocol { }
Protocols define behaviors and characteristics that will be implemented by another class, struct or enum
This might include variables or methods signatures:
protocol Themable {
  var themeColor: UIColor { get }
  func set(color: UIColor)
}

extension UILabel: Themable {

  var themeColor: UIColor {
    return self.textColor
  }

  func set(color: UIColor) {
    self.textColor = color
  }
}

let label = UILabel()
label.set(color: .green)
label.themeColor // UIColor.green
Delegates often use protocols to achieve Dependency inversion (SOLID principles).
Delegation pattern: An object handles a request by delegating it to a second object
A very common example is the
UITableViewDelegateprotocol:
usually we implmenet the methods of that protocol into our own UIViewController, to let the tableView delegate some logic.class MyTableViewDelegate: NSObject, UITableViewDelegate { // This is a method declared inside UITableViewDelegate, required for us to be implemented. func tableView(_ tableView: UITableView, didSelectRowAt indexPath: IndexPath) { { ... Do something ... } } } class MyViewController: UIViewController { @IBOutlet weak var tableView = UITableView! let myTableViewDelegate = MyTableViewDelegate() override func viewDidLoad() { super.viewDidLoad() // { ... } tableView.delegate = self.myTableViewDelegate } }
POP (Protocol Oriented Programming)
This is a new concept that for us iOS developers came with Swift.
Very good videos from past WWDCs are available here:- 2015 - Session 408: Protocol-Oriented Programming in Swift
- 2016 - Session 419: Protocol and Value oriented programming in UIKit apps
- 2018 - Session 406: Swift Generics
This brings the concept of composition over Inheritance: avoid subclassing, use protocols to focus on single, small functionalities and compose a new complex object by merging them together.
We can give a standard implementation for each protocol
protocol Movable {
    func move()
}

protocol HasSpeakAbility {
    func talk()
}

protocol HasWalkAbility {
    func walk()
}

protocol HasRunAbility: HasWalkAbility {
    func run()
}
Use protocol extensions
A protocol extension is an useful way to share a common implementation between al objects that extend the same protocol. In this example we have an extension for each protocol that simply prints out the action of its main defining method.
If we would ever need a more specific implementation, nothing stops up to implement that method directly from the object struct/enum/class that extends the protocol.extension Movable { func move() { print("I'm moving") } } extension HasWalkAbility { func walk() { print("\(String(describing: self)): I'm walking") } } extension HasRunAbility { func run() { walk(); print("....faster") } } extension HasWalkAbility where Self: Movable { func walk() { print("I'm walking") } } struct Hero: HasRunAbility, HasSpeakAbility { let name: String func talk() { print("oh s**t!") } } struct Zombie: HasWalkAbility, HasSpeakAbility { func talk() { print("GAAARGH") } } let zombie = Zombie() let hero = Hero(name: "Hero") zombie.walk() hero.walk() zombie.talk() hero.talk() hero.run()Use protocol composition
Sometimes it’s easy to identify behaviors that can be logically linked together. For example, we cannot run if we don’t know how to walk.
We might want a shortcut to call all the hero actions, or all the zombie actions.typealias HeroActions = HasRunAbility & HasSpeakAbility & Movable typealias ZombieActions = HasWalkAbility & HasSpeakAbility & Movable extension String { var mutableString: NSMutableAttributedString { return NSMutableAttributedString(string: self) } }Composition comes really handy when we want to declare some method optional. Let’s focus on
UITableViewControllerDataSource, this is taken from the header file ofUITableView.@protocol UITableViewDataSource<NSObject> @required - (NSInteger)tableView:(UITableView *)tableView numberOfRowsInSection:(NSInteger)section; - (UITableViewCell *)tableView:(UITableView *)tableView cellForRowAtIndexPath:(NSIndexPath *)indexPath; @optional - (NSInteger)numberOfSectionsInTableView:(UITableView *)tableView; - (nullable NSString *)tableView:(UITableView *)tableView titleForHeaderInSection:(NSInteger)section; {...}We see the
@requiredand@optionalattributes preceeding those methods. They declare which ones have to be implemented and which ones can be left out.We could achieve a similar result by using protocol composition: one protocol will contain the optional methods, the other one the required.
protocol UITableViewRequiredDataSource {
  func tableView(_ tableView: UITableView, numberOfRows section:NSInteger)

  func tableView(_ tableView: UITableView, cellForRowAt indexPath: IndexPath)
}

protocol UITableViewOptionalDataSource {
  func numberOfSections(_ tableView: UITableView)
  func tableView(_ tableView: UITableView, titleForHeader section: Int)
}
And then composing a new type depending on what behavior we need:
class MyViewController {
  @IBOutlet weak var tableView: UITableView!

  private var tableViewDataSource: UITableViewRequiredDataSource

  // or

  private var tableViewDataSource: UITableViewRequiredDataSource & UITableViewOptionalDataSource
}
I hope this might help as a reference :)
-
#12 - SQFeedbackGenerator
SQFeedbackGenerator 📳
Available on github
I’m spending my weekends building my app called Squirrel, and I wrote a simple class to take advantage of
AudioServicesPlaySystemSoundto provide an haptic vibration for certain scenarios (error, success, notification).I noticed this functionality thanks to Bear, an amazing note taking app (which btw, is made in 🇮🇹!)

Give it a spin on your device with:
pod try SQFeedbackGeneratoror add this to your Podfile:
pod 'SQFeedbackGenerator' -
#11 - Better commits
This git commit style is really helpful.
Makes easier to filter only what is important or to generate changelog automatically.Karma commits
Prepend one of these to your commit.feat: (new feature) fix: (bug fix) docs: (changes to documentation) style: (formatting, missing semi colons, etc; no code change) refactor: (refactoring production code) test: (adding missing tests, refactoring tests; no production code change) chore: (updating grunt tasks etc; no production code change) -
#10 - Fix Crashlytics missing dSYM
I was facing the following problem: AppStore with the latest production build and crashlytics without the corresponding dSYM file needed to symbolicate the crashes.
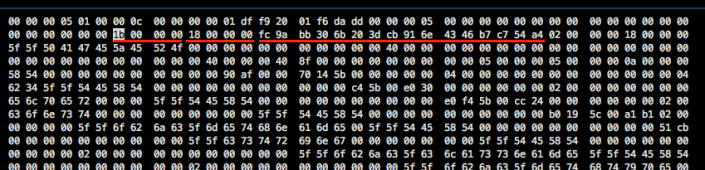
What to do?After some investigation, this is what I got from a freshly build dSYM:
-
LC_UUIDloads at the beginning of the binary file, with the command1B. - Even if the architecture is litte endian, the UUID are written as big endian. This is a specification of the UUID:
[...]
    /* put name space ID in network byte order so it hashes the same
      no matter what endian machine we're on */
[...]
So:
-
Go back to the deploy commit, make sure the build system will re-generate the app at the same status.
-
Archive again, with fastlane’s gym or with a xcarchive
$ bin/gym # <- (I'm using bundler) -
Get the current UUIDs
$ dwarfdump -u /path/to/MyApp.DSYM UUID: EBD9418E-20FF-44C1-8D3F-D7E75CC6F0B1 (armv7) MyApp.dSYM/Contents/Resources/DWARF/MyApp UUID: D9936E8B-139E-4F63-A063-7863EEFF6B99 (arm64) MyApp.dSYM/Contents/Resources/DWARF/MyApp -
Change the UUIDs of the binary file with a hex editor.
We are looking for the LC_UUID load command1B000000and we know that the command size is a 24 bytes long (or 0x18000000). What is following those bytes is our actual UUID.
Or1B000000 18000000 XXXXXXXX XXXXXXXX XXXXXXXX XXXXXXXX, where XXXXXXXX are the bytes you may want change with the correct UUID. -
Save, submit, start bugfixing.

-
-
#9 - Synced countdown
Long distance relation but still want to watch a movie together?
Here comes Syncstart!
Last week I decided to build a synced timer between two web clients, without actually spend more then an afternoon on it.
The idea behind is pretty simple:
- first client opens the webapp and receives a code
- second client opens the webapp and enters the code.
Oh, and you find yourself playing rock-paper-scissors-lizard-spock too.
Since I need some data persistency and a free hosting service, I chose Heroku + mLab mongodb instance.
Heroku solutions are really became pretty neat for this kind of super-quick prototyping/ideas.
The code is available on github.References
- Syncstart
- Git repository: Syncstart repo
- Socket.io emit list: Actually I saved a snippet here
-
#8 - Leveraging Apple Wallet
Preparing for WWDC?
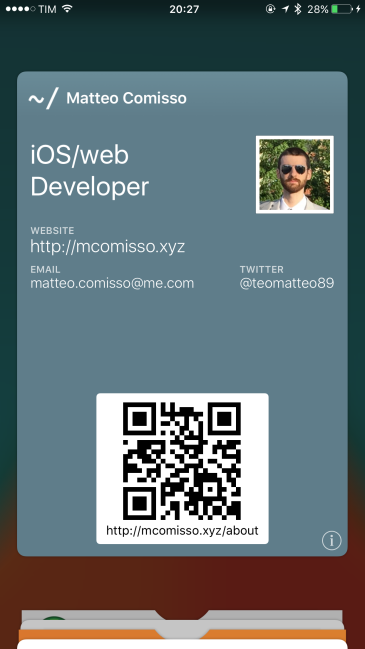
Since I’m kinda a social awkward guy, I’ve decided to create a little pass for the iOS Wallet. The idea is to share it online, and make it pop onto the display when someone is getting close to me, just to say “Hi” and/or share contact information.
A standalone application to distribute would be a dumb choice to make, since no one wants to keep a cv in their precious homescreen… but wallet and its passes can come in handy.
iBeacons are also silently issued by iOS, and such a not-so-much-known-functionality is inside passbook since iOS7.Making passes is super easy. A pass is just a
jsonfile, with a bunch of predefined images inside a directory named any.pass, plus the signing commandsignpasswhich sits in your $PATH since XCode installation.Only a short number of keys are required on the first json level:
key name Type Description description localizable string Required. Brief description of the pass, used by the iOS accessibility technologies. Don’t try to include all of the data on the pass in its description, just include enough detail to distinguish passes of the same type. formatVersion integer Required. Version of the file format. The value must be 1. organizationName localizable string Required. Display name of the organization that originated and signed the pass. passTypeIdentifier string Required. Pass type identifier, as issued by Apple. The value must correspond with your signing certificate. serialNumber string Required. Serial number that uniquely identifies the pass. No two passes with the same pass type identifier may have the same serial number. teamIdentifier string Required. Team identifier of the organization that originated and signed the pass, as issued by Apple. { "description": "Matteo Comisso", "formatVersion": 1, "organizationName": "Matteo Comisso", "passTypeIdentifier": "pass.reverse.dns", "serialNumber": " take the latest group of digits from `uuidgen` ", "teamIdentifier": " *redacted* ", "..." : "...", }But we can add more keys to personalize it. It will kinda match this site palette, just for a bit of consistency.
{
  "..." : "...",
  "logoText": "Matteo Comisso",
  "labelColor": "rgb(206, 215, 219)",
  "foregroundColor": "rgb(255, 255, 255)",
  "backgroundColor": "rgb(95, 125, 138)",
  "..." : "..."
}
And finally the beacon section:
key name Type Description major 16-bit unsigned integer Optional. Major identifier of a Bluetooth Low Energy location beacon. minor 16-bit unsigned integer Optional. Minor identifier of a Bluetooth Low Energy location beacon. proximityUUID string Required. Unique identifier of a Bluetooth Low Energy location beacon. relevantText string Optional. Text displayed on the lock screen when the pass is currently relevant. For example, a description of the nearby location such as “Store nearby on 1st and Main.” { "..." : "...", "beacons": [{ "proximityUUID": "96A1736B-11FC-85C3-1762-80DF658F0B29", "relevantText": "Matteo salutes you 👋" }], "..." : "...", }iOS will take care to scan for geofencing regions, and display it on the lockscreen when inside one. And yes, emojis.
The full
pass.jsonhere following:The directory structure will have this hierarchy:
mcomisso.pass
├── icon.png
├── [email protected]
├── logo.png
├── [email protected]
├── pass.json
├── thumbnail.png
└── [email protected]
And the latest thing to do is call
signpasswith the -p option.signpass -p mcomisso.passAbout testing
You have to send it via email or downloading with http to your device.
I preferred starting up MAMP, putting it in a new folder inside htdocs and doing aecho '<html><body><a href="./mcomisso.pkpass">DOWNLOAD PASS</a></body></html>' > index.htmlTap, add, done.
Final result

References
-
#7 - Socket io emit/broadcast list
While developing a small personal project on socket.io, I found this great answer on stackoverflow.
 // sending to sender-client only
 socket.emit('message', "this is a test");

 // sending to all clients, include sender
 io.emit('message', "this is a test");

 // sending to all clients except sender
 socket.broadcast.emit('message', "this is a test");

 // sending to all clients in 'game' room(channel) except sender
 socket.broadcast.to('game').emit('message', 'nice game');

 // sending to all clients in 'game' room(channel), include sender
 io.in('game').emit('message', 'cool game');

 // sending to sender client, only if they are in 'game' room(channel)
 socket.to('game').emit('message', 'enjoy the game');

 // sending to all clients in namespace 'myNamespace', include sender
 io.of('myNamespace').emit('message', 'gg');

 // sending to individual socketid
 socket.broadcast.to(socketid).emit('message', 'for your eyes only');
So far,
-
#6 - Manage osx apps with brew and brew cask
Brew
Kickstart
Brew is a modern, fast and full-featured package manager for OSX.Brew installation
/usr/bin/ruby -e "$(curl -fsSL https://raw.githubusercontent.com/Homebrew/install/master/install)"Detect current configuration problems
Brew will list any issue and suggestion about how to fix it.$ brew doctorBasic usage
Search for software
$ brew search wgetInstall software
$ brew install wgetDelete software
$ brew rm wgetUpdate brew, upgrade formulas, clean older and cache
$ brew update && brew upgrade && brew cleanup
Brew cask
Brew cask is now integrated with Brew. It manages graphical software, by installing it in
/opt/Homebrew-cask/Caskroom/and linking the apps to~/Applications/. More info available here: Homebrew CaskSearch
$ brew cask search slackInstall
$ brew cask install slackRemove
$ brew cask rm slackCompletely uninstall
$ brew cask zap slackClean
$ brew cask cleanup -
#5 - Node.js with nvm
Node Version Manager
Manual install:
$ git clone https://github.com/creationix/nvm.git ~/.nvm && cd ~/.nvm && git checkout v0.31.0
$ echo "source ~/.nvm/nvm.sh" >> ~/.zshrc
$ source ~/.zshrc
Check if works:
$ nvm --version
0.31.0
Install Node.js
Get a list of available installations:
$ nvm ls-remote
[...]
v5.7.1
v5.8.0
v5.9.0
Install Node
$ nvm install v5.9.0Check
$ node -v -
#4 - Manage ruby installations with rbenv
I switched to rbenv over rvm and I actually find it really intuitive.
Kinda as a personal manual, here is a list of the most used commands.Install rbenv
Use brew as the default package manager in osx.
brew install rbenv rbenv-buildAppend the following code to bash or zsh profile to initialize the
rbenvcommand.echo 'eval "$(rbenv init -)"' >> ~/.zshrc source ~/.zshrcUsage
List
Fetch the list of available ruby versionsrbenv install -lInstall
Install the desired versionrbenv install 2.3.0Global
Make it available globallyrbenv global 2.3.0Local
Or make it local. Each directory can have a local default ruby version.rbenv local 2.2.0 -
#3 - Quick assign variables in jekyll
Quick assign variables in jekyll.
Square brackets seem to do the job correctly.
Edit 2016-03-08
- Changed initial text for lower height in preview (blog page).
This is how the
projects/index.htmlpage is built:{% include projects.html project_title="Current projects" status="current" %} <div class="spacer"></div> {% include projects.html project_title="Past projects" status="past" %}And this is the basic
project.htmltemplate:[...] {% for project in site.data.projects.[include.status] %} <li> <span> <a href="{{project.site}}"> <span>{{ project.name }}</span> </a> <span> {{ project.description }} </span> </span> </li> {% endfor %} [...]So, a inclusion can have parameters
{% include projects.html [...] status="current"%}and you can include them right away with square brackets{% for project in site.data.projects.[include.status] %}. -
#2 - 5 Most useful plugins in Xcode
A quick list of super-useful plugins for Xcode.
Alcatraz
Well, this is essential. Simplifies a lot the install/uninstall passage for almost any other plugin or extension.
Download it by pasting this line into a new terminal window:curl -fsSL https://raw.githubusercontent.com/supermarin/Alcatraz/deploy/Scripts/install.sh | shGitDiff
Highlights every line has changed since the last commit. It is also possible to reset the highlighted lines or just find out what was written there before the editing.
VVDocumenter-Xcode
Keeping your code documented? So annoying without this.
Just enter///over one of your classes, methods definition, variables to get the Xcode supported documented section.KSImageNamed
How many times do you forget about the name of that image in xcassets?
With KSImageNamed you get for free a list + preview of the stored images. Just start typing[UIImage imageNamed].Autoindent with save
If you get annoyed by not having code correctly indented, this is the right plugin to install.
It checks and re-indent all the code every time you presscmd + S. -
#1 - Base installation of Raspberry Pi
Installation Quick List
-
Download Raspbian. Jessie is the latest stable at the moment, based on debian.
-
Unzip it and write it down to a sdcard.
sudo dd if='/path/to/file.img' of='/dev/sdcard' bs=1024 -
Boot! Attach network cable, sdcard, power.
Make it yours
After the installation, it is highly suggested to change the auth for accessing the pi.
-
Change the password
You definitely do not want the default password to access a passwd-less sudo account.$ sudo passwd pi -
Increase ssh security
 The /etc/ssh/ssd_config file contains all the configurations for the ssh daemon.
- Change auth method (repeat step 1-2-3 for every machine, use always different keys for each one)
PASSWORDS ARE BAD.-
Do a
ssh-keygen -t rsa -b 4096on the host machine and follow the instructions to generate a new key. -
Copy the freshly generated public key
$ cat .ssh/id_rsa.pub | pbcopy -
Add it to the raspi authorized keys
$ sudo nano .ssh/authorized_keys -
Edit the sshd_config PasswordAuthentication parameter
$ sudo nano /etc/ssh/sshd_config [...] PasswordAuthentication no [...] -
Restart ssh
$ sudo service ssh restart
-
Change default sshd port
-
Edit the ssd_config port
$ sudo nano /etc/sshd_config # Package generated configuration file # See the sshd_config(5) manpage for details # What ports, IPs and protocols we listen for Port 1234 -
Restart ssh
$ sudo service ssh restart
-
-
- Change auth method (repeat step 1-2-3 for every machine, use always different keys for each one)
-
subscribe via RSS